After building a project and generate a Jar file you need to generate a number of your build in the target file and that number will help you to know which version you have and update your app easily but after each build you should increment version and that will be hard and boring .So in this article you will find a lab that explains to you how to Versioning, Building and Deploying your application with one Jenkins Pipeline easily.
Prerequisites
- Basic knowledge of the terminal
- A Jenkins server
- A Dockerhub account
- AWS account
- A GitHub or Gitlab account
- A smile on your face (Put up that smile friend ?)
Introduction
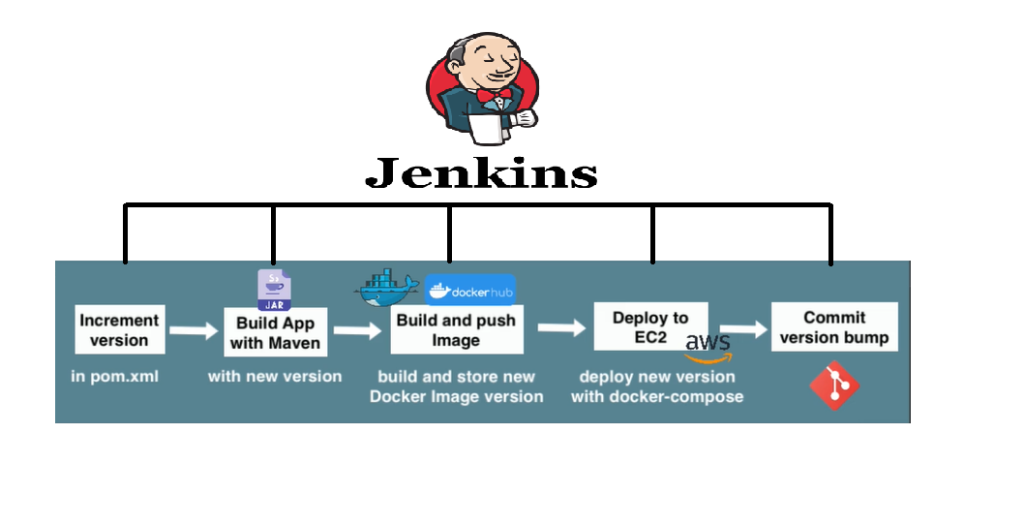
To automate your task in Jenkins you should make a pipeline that responds to your need. Like our case we will write a Jenkins File that contains some stages .(Increment version, build app, build image, deploy and commit version update)

code source of jenkins file here
In this Jenkins file you will see a different method to to write a pipeline like using another shared project or use groovy scripts or script shell.
stage Increment version
Method write script on Jenkinsfile:
Now we will start with how to increment the version of our build in the pom.xml file. The version composes of three elements major, minor, and path. You will find the scripts also in the Jenkins file.
stages {
        stage("increment version"){
                steps {
                    script {
                        echo 'increment version'
                       sh 'mvn build-helper:parse-version versions:set \
                        -DnewVersion=\\\${parsedVersion.majorVersion}.\\\${parsedVersion.minorVersion}.\\\${parsedVersion.nextIncrementalVersion} \
                        versions:commit'
                    def matcher = readFile('pom.xml') =~ '<version>(.+)</version>'
                    def version = matcher[0][1]
                    env.IMAGE_NAME = "$version-$BUILD_NUMBER"

                    }
                }
            }
stage build app and build docker image
Method using shared library:
In this stage we will use another method to build our app by using another shared library that contains all the method predefined written in scripts groovy.
There is another lab that explain you how to build a Jenkins shared library to use it on all projects.
library identifier: 'jenkins-shared-library@main', retriever: modernSCM(
    [$class: 'GitSCMSource',
     remote: 'https://github.com/noucair/jenkins-shared-library',
     credentialsId: 'github-code'
    ]
Now we will build our app by maven and generate a Jar file after increment the version. And after that we will build an image docker.
stage('build app') {
            steps {
               script {
                  echo 'building application jar...'
                  buildJar()
               }
            }
        }

        stage('build image') {
            steps {
                script {
                   echo 'building docker image...'
                   buildImage(env.IMAGE_NAME)
                   dockerLogin()
                   dockerPush(env.IMAGE_NAME)
                }
            }
        }
stage deploy
Method using script shell:
Now we will deploy our application using AWS server by using a scripts shell
Code source of scripts shell here
 stage('deploy') {
            steps {
                script {
                   echo 'deploying docker image to EC2...'
                   def shellCmd = "bash ./shellscript.sh ${IMAGE_NAME}"
                   sshagent(['ec2-server-key']){
                       sh "scp -o StrictHostKeyChecking=no shellscript.sh ec2-user@IP:/home/ec2-user"
                       sh "scp -o StrictHostKeyChecking=no docker-compose.yaml ec2-user@IP:/home/ec2-user"
                       sh "ssh -o StrictHostKeyChecking=no ec2-user@IP ${shellCmd}"
                   }
                }
            }
        }
stage commit version update
Finally, after building our app and deploy it, we shouldn’t forget to update our code on github using the script bellow
  stage('commit version update') {
            steps {
                script {
                    withCredentials([usernamePassword(credentialsId: 'github-code', passwordVariable: 'PASS', usernameVariable: 'USER')]) {
                        // git config here for the first time run
                        sh 'git config --global user.email "[email protected]"'
                        sh 'git config --global user.name "jenkins"'
                        sh 'git status'
                        sh "git remote set-url origin https://${USER}:${PASS}@github.com/noucair/lab1-Versioning-application-"
                        sh 'git add .'
                        sh 'git commit -m "ci: version bump"'
                        sh 'git push -u origin main'
                    }
                }
            }
        }
conclusion
By using this Jenkins file you will conserve many times and do a lot of work at the same time. Also, we could improve this Jenkins file another time. Feel free to contact me if you have questions or advise me